Essentially a mixed media artist I discovered the Powertex range of products about seven years ago and I haven't looked back since.
The versatility of the range and the fact that all ages and abilities can create their own unique piece of art are just some of the reasons that in March 2014 we became the distributors of the products in the UK.
We are now enjoying travelling around the country introducing everyone to this amazing range of products and taking on a network of tutors who will have the products available and run workshops in their local area. Watch out for us in a town near you!
Have you got what it takes to run your own art and craft business? We have opportunities as tutors and stockists of Powertex products and running workshops around the country.
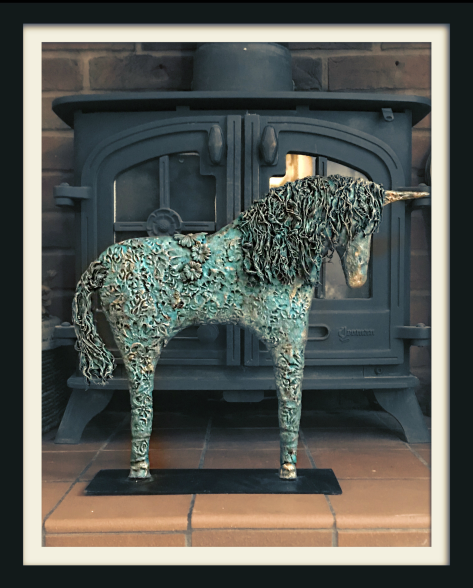
I adore this photograph that Michele took of the unicorn I made as my sample for our Powertex Garden Party last summer and guess what, I am getting to do it again on Saturday 17th November when I will have a lovely group coming to my studio to share a day of fabulous crafting fun!
Watch this space and I will share some images of this weekends makes in our The Powertex Studio group over on Facebook, you may have to ask to join but as long as you are nice you can be sure we will let you in!
If you missed out on this special workshop keep an eye on the SPECIAL EVENTS section on the Powertex UK website, we will have lots going on next year. 😉
We are thrilled to be bringing you these amazing boxes just in time for Xmas, now you have the ideal thing to say when someone asks you “what could I buy you for Xmas?”
**********
As the name implies the contents will be a secret, who doesn’t love a secret?
I’m not very good at keeping secrets but I would be in big trouble if I gave this one away! However, I can tell you that here will be things like Powertex, pigments, paints, powders, MDF, metal embellishments and so much more. Some of the products will be exclusive to your The Secret Art Box and others will be seen here first items.
**********
Every piece has been handpicked because I think I would like to use it with my Powertex projects and members of our design team will also have them so there will be blogs about how they have used them over on The Powertex UK BLOG
Doesn’t time fly when you are busy enjoying yourself?
Well you can safely say we have been busy and definitely say we have been enjoying ourselves as we have whizzed around the UK introducing so many people to the wonders of Powertex. Some of you will also have seen us on Hochanda and we are going to be continuing with this from time to time.
We now have well over 100 Certified tutors trained by little old me so that you can be sure each and every one of them has the knowledge and back up to ensure you are getting the very best attention.
We have an incredible design team who are bringing you brilliant blogs on a regular basis. Signing up to the blog is the equivalent of getting a FREE magazine article or tutorial delivered direct to your email inbox several times a month. Our blog has been housed on the Blogger platform but as it has grown we have decided that here on WordPress is going to suit us better and as of today you will be able to find us at powertexuk.blog
We have a wonderfully informative newsletter that you can sign up to receive either through the link on our Facebook or by subscribing from your account on our website, don’t miss out on this great resource as we often announce new products and special offers here first!
So this month has seen the Hochanda launch of my latest online tutorial!
It’s not too late to get your copy, it’s easy to buy, if you click on the image above it will take you straight to the Powertex UK website.
Access is for life so you can watch it as many times as you like.
**********
I am going to be doing more of these, they will vary from shorter projects that will be suitable for a beginner and longer more in depth ones for those of you who have been using Powertex for a while and feel you are ready to move on to the next level. There will also be some FREE view quick and easy technique tutorials added as I go.
**********
Of course no online tutorial is the same as going along to one of our fabulous team of Certified Tutors, not only will you have the benefit expert hands on help but you will enjoy a social event at the same time. If you think this is more for you please register for our tutor directory to find your nearest tutor, you can do that here
I don’t know about you but I love this time of year. Once the marigolds start appearing in our field it’s time to start and have a good clear out in the garden in anticipation of a long sunny summer, well we can all dream!
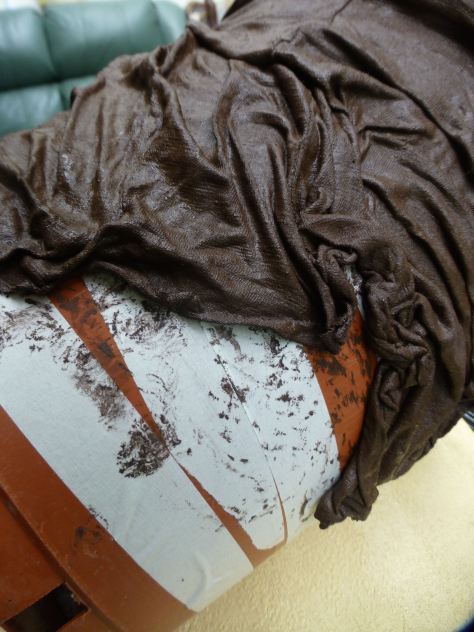
Inevitably the plans mean taking a look at our plant pots and deciding which ones we want to keep and which ones need to be discarded, at this point all I can think about is how fabulous the cheap plastic ones at the back of the shed will look with some Powertex dipped fabric wrapped around them.
The first thing I need to do is sort out some odds and ends of recycled fabric, it’s important at this stage to make sure everything is natural fibres so that my plant pot is weatherproof. the plaster pieces will need covering completely to seal out the weather too.
The next job is to get my fabric into the fabric hardener, I chose bronze for this project.
Powertex doesn’t stick to plastic so before I started I added some random pieces of paper tape to my plant pot.
I had fun adding the different fabrics to give me great texture, Powertex sticks to itself easily so I can get really creative here.
We started our run of Spring shows last week with a fabulous few days at Event City in Manchester and what an amazing time we had!
We bring along lots of Powertex goodies for you!We get the workshop area ready and our local distributors come along to help you.
It’s incredibly hard work setting up our stand and running our workshops but we will never get tired of seeing everyones faces when they realise what a beautiful piece they have created!
We love it when our customers send us photos of the mini work of art they get to take home!
This is what Sharon made in Manchester.
Keep an eye on our Facebook page so that you know when we come to a town near you!
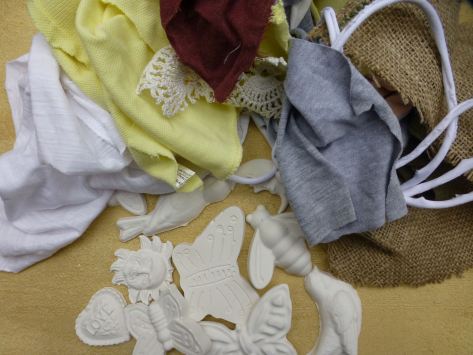
We have been busy over the past few weeks sourcing lots of lovely different pieces of fabric ready for our upcoming workshops around the country this year. It’s important that they are all natural fibres to ensure they harden perfectly and we can say your finished pieces can go outside after the three weeks drying time so we always try a test piece first.
1. First of all I snipped of some small pieces of fabric, took an old DVD as a base and some black Powertex hardener.
2. Next I dipped, squeezed and massaged the Powertex hardener into my fabric and laid it onto the DVD and left this to dry for a few hours whilst I went for a walk in the woods with my lovely little dog Frankie.
3. After checking that each of the fabrics were hardening well I used some Colortrix bronze gold pigment and Powertex Easy Varnish to dry brush everything, considering it was just meant as a test piece I was really pleased with the result – it just demonstrates perfectly how the use of different fabrics creates great textures when they are over brushed with our fabulous vibrant Colortrix pigments.
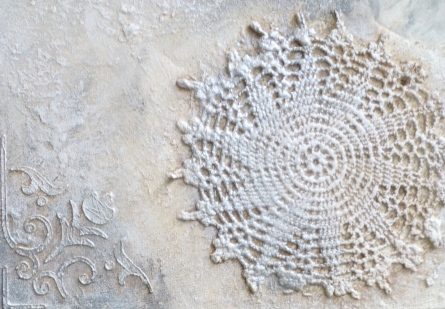
Further to my last post I wanted to share this other mixed media work with you. She was given her title by one of our distributors, Liz Dixon, and bearing in mind the low temperatures over the recent days I thought I would share her with you.
I covered my canvas with ivory and lead Powertex hardener in a random pattern. Once fully dried I transferred the image using Powerprint, my main concern here was making sure the Powerpoint was spread evenly and didn’t dry out anywhere before I put the image down ready for the transfer, it’s important to be quick and thorough when using a larger image otherwise it can be so disappointing to reveal your image and find a crucial bit hasn’t transferred.
I added a little more hardener and gently worked in some Stone Art powder, picking up the texture by dry brushing with ivory Powertex hardener once everything was dry.
I chose some pieces of cotton lace ‘snowflakes’ to embellish my piece and rubbed in ivory hardener before applying them onto my canvas. I then used a stencil and some Easy structure to add interest in my corners, you can see detail of this above.
A touch of silver and gold colortrix and I was done!
What about the little birdcages I hear you ask?
I have no excuse for that, I liked them and felt they were right for the spot!
These are the products I used!
If you fancy having a go yourself you can get all of the products via our website: http://www.powertex.co.uk or you can find your local distributor, who will be running regular workshops and able to supply your products as well!
With the discovery of coloured bister and Brusho paints I just had to take the time to apply them to a Powertex piece.
I have always loved mixed media, this being the very reason I started using Powertex in the first place, long story but here we are today distributing the products in the UK.
I have used Powerprint here to transfer the image of the child and Easy coat glossy to decoupage the other image. I created texture with Easy structure and stencils from my stash. I crackled ivory Powertex hardener using my coloured bister and sprinkled granules of it over areas with a spray of water for extra effect. I also used Brushos both diluted and sprinkled for some intense colours and those runs. Instead of ink I used black Powertex hardener on my acrylic stamps too, works a treat!
That’s just about it! More details and tutorials will follow, I hope you join me!
Sharing news and inspiration for Powertex UK and The Secret Art Loft products.


 The next job is to get my fabric into the fabric hardener, I chose